23.1 Bokeh, focus stacking, and depth-of-field control⧉
A lens images one plane of the scene sharply and lets everything else blur. The medium cannot hold all depths sharp at once (Chapter 5.8, Photographic representation and its limits). Depth of field is the depth axis of that sharpness: which distances render acceptably crisp, and (the part this chapter cares about most) how the out-of-focus rest looks. FUNDAMENTALS settled the first question quantitatively. The second question, the look of the blur, is where photographers spend money and where the optics gets interesting, because the blur is not a featureless smear. Every out-of-focus highlight is a tiny picture of the lens's own aperture, and the character of that picture (round or polygonal, evenly filled or bright-rimmed, circular in the center but clipped to a cat's-eye at the edge) is what the Japanese loanword bokeh names. After the bokeh we turn practical: focus stacking to beat the depth-of-field limit from above, and depth-aware blur to fake shallow depth of field from below.
23.1.1 The geometry of focus⧉
Everything quantitative about depth of field was derived in FUNDAMENTALS, and this section only reminds you of the results so the rest of the chapter has them in hand. Focus a lens on one plane; a point exactly on that plane sends a cone of rays that reconverges to a sharp point on the sensor. A point nearer or farther focuses behind or in front of the sensor, so by the time its cone reaches the sensor it has opened (or reopened) into a small disk: the circle of confusion (CoC), of diameter that grows with the aperture and with the point's distance from the focus plane. A point counts as "sharp" while its circle of confusion stays under a tolerance diameter $c$ set by sensor resolution and viewing size (Figure 23.1.1, and the full geometry in FUNDAMENTALS).
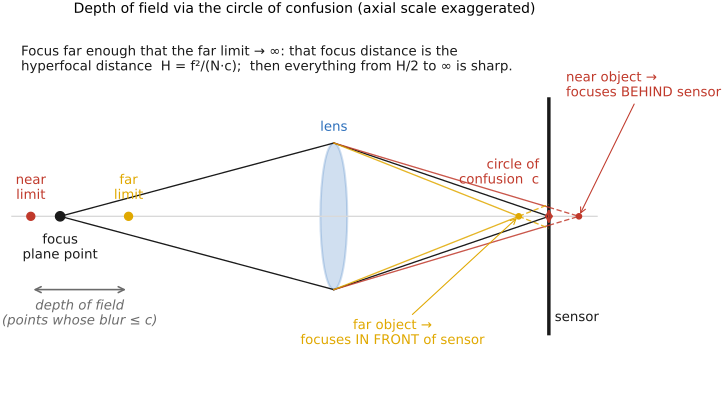
The band of acceptably-sharp distances is bounded by a near limit and a far limit, fixed (via similar triangles and the conjugate relation $1/f = 1/u + 1/v$) by where the circle of confusion reaches $c$. The nearest focus setting whose acceptable far limit reaches infinity is the hyperfocal distance
where $N = f/D$ is the f-number. In the thin-lens model, focus at $H$ and the near limit is $H/2$, with the far limit at infinity. The three knobs all push the same way, and they are the right intuition to keep in mind: depth of field grows with a smaller aperture (larger $N$), a shorter focal length $f$, and a greater focus distance. Stopping down is the photographer's main lever, but it costs light and, pushed too far, hands the image to diffraction (previous chapters), a wall the focus-stacking section will go around. Two further FUNDAMENTALS results matter below. First, depth of field is really about magnification, not focal length: for fixed magnification, f-number, and blur tolerance, the near-subject depth-of-field approximation is largely independent of focal length (the framing-invariance result), so "telephotos have shallow depth of field" is, as stated, a myth. Second, sensor size scales depth of field: shrink the sensor while keeping viewpoint, framing, f-number, and final viewing size fixed, and depth of field increases approximately inversely with the sensor's linear scale, which is exactly why phones have enormous depth of field and must fake the shallow look.
Finally, the load-bearing caveat that this whole part keeps returning to: defocus is not a 2-D convolution of the image. The blur radius at each pixel depends on that point's scene depth, not its image position, so the blur is spatially varying in a way tied to 3D structure; and at depth discontinuities occlusion matters: the foreground's blur should bleed over the background, and some background hidden from the center viewpoint may be visible through other pupil positions. A single central image does not contain all that background. A flat disk blur can do neither. This is precisely why naive portrait-mode fakes break at hair and edges, and why the depth-aware and light-field methods (forward-ref to the Advanced part) exist. Keep this in mind through the bokeh section: even within the in-focus-vs-out-of-focus story, the out-of-focus part has real optical structure that a convolution would erase.
23.1.2 The bokeh look: shape and structure of the blur⧉
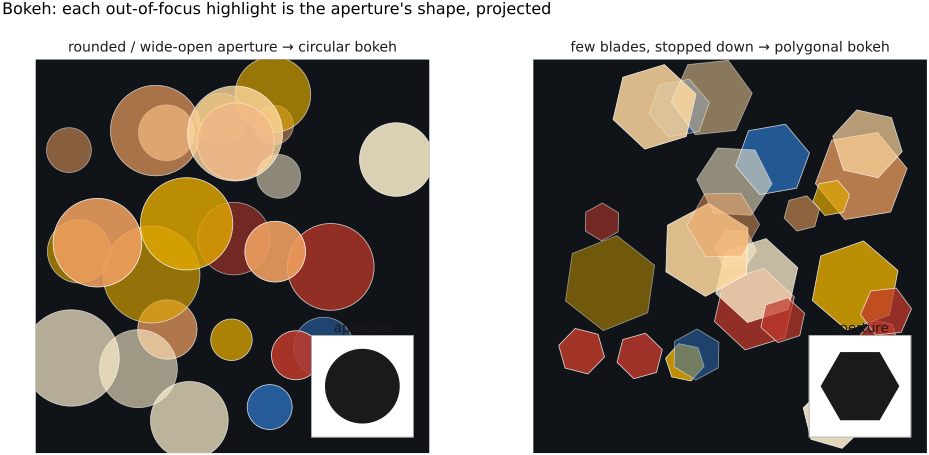
FUNDAMENTALS drew the circle of confusion as a uniform disk because for the geometry of depth of field that is all it needs to be. But look at a real out-of-focus highlight (a streetlight, a glint on water, a gap of sky through leaves) and it is not a featureless smear. It has a definite shape and a definite brightness profile, and those two properties, taken together, are what photographers mean by bokeh (from the Japanese boke, "blur"). In the geometric, sufficiently defocused regime, the highlight approximates a projected pupil image, modified by aberrations, transmission, and diffraction. A bright point too far from focus spreads its cone across the whole opening of the lens, and the patch of light it paints on the sensor is that opening, projected, so the shape of the blur is the shape of the aperture.
That single fact explains the most visible bokeh trait: blade shape. A lens with a perfectly round iris renders out-of-focus highlights as round disks. But an iris is built from a handful of straight metal blades, and when you stop down those blades close into a polygon: a pentagon with five blades, a heptagon with seven, an octagon with eight. So a stopped-down lens turns every background highlight into a little polygon of the same number of sides as the iris (Figure 23.1.2). Wide open, the blades retract to the edge and the opening is nearly circular; stopped down, the corners appear. This is why lens makers advertise blade count and curved blades: more blades, and blades with a curved edge, keep the opening round deeper into the aperture range, which most photographers prefer.
Shape is only half of it; the other half is the brightness profile across the disk, and this is what separates "good" from "bad" bokeh. An ideal defocus disk is uniformly lit, a flat token of light. Real lenses are not ideal, and residual spherical aberration (the previous chapters' marginal-ray defect) redistributes the light within the disk. For background defocus, over-corrected spherical aberration can produce a bright rim, so background highlights become hard-edged little doughnuts and fine background texture turns into a jittery mess of bright outlines, the look photographers call nervous or busy bokeh, the kind that makes a leafy background distracting. Under-correction can instead soften the background disk edge (a soft-edged, evenly-filled blob) and the background melts smoothly: creamy bokeh. The foreground and background tendencies reverse across focus, so a preference for one side need not improve the other. This is why a portrait lens is designed around its disk profile as much as its sharpness; a lens can resolve beautifully on the focus plane and still render an ugly background. Special optics showed the deliberate versions of both extremes: a soft-focus lens leaves spherical aberration in on purpose for a glowing halo, while an apodization element grades the pupil's transmission so the disk has no hard edge at all, smooth-edged defocus highlights by hardware design, the optical cousin of computational bokeh.
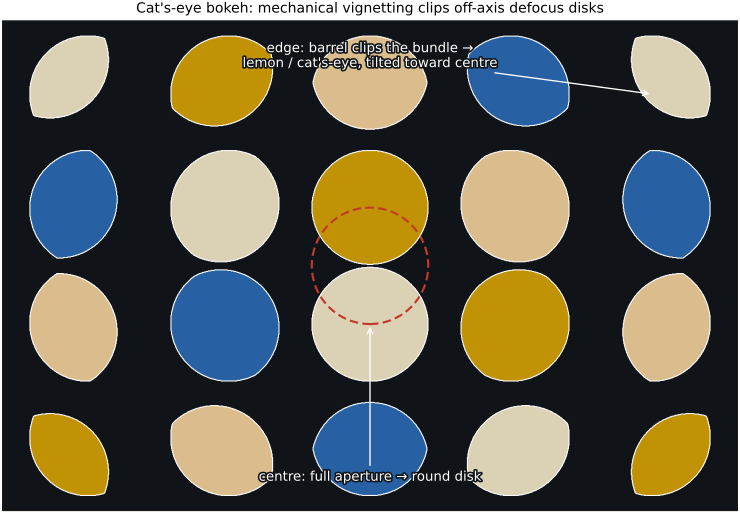
There is a third effect, and it is purely positional: highlights are round in the center of the frame but get clipped to a lemon or cat's-eye shape toward the corners. The cause is optical vignetting (introduced with the pupil in Compound lenses). For an off-axis point, the effective aperture is no longer the full iris: the lens barrel, and the rims of the front and rear elements, partly block the slanted cone, so the entrance pupil seen from that off-axis direction is a lens-shaped intersection of two offset circles rather than a full circle. The defocus disk, being the image of that clipped pupil, comes out as a cat's-eye (or "lemon"), typically compressed radially, with its long axis roughly tangential around the frame center and the clip growing more severe toward the corners, which is what produces the swirl pattern seen in some classic lenses, the disks swirling around the image (Figure 23.1.3). Two things follow. First, stopping down restores round disks: once the iris is the limiting opening, optical clipping can diminish; highlights then follow the iris shape and pupil projection, so they need not be circular everywhere, the same stopping-down that also cures the darkening form of optical vignetting in the corners. Second, this is distinct from the FUNDAMENTALS $\cos^4$ natural vignetting (a geometric falloff that cannot be stopped away); cat's-eye bokeh is the optical (mechanical) vignetting, owned by the barrel, which can.
These three levers (aperture shape, disk profile, and corner clipping) also generalize to the special optics of the previous chapter, whose earlier special cases now fit the same mechanism. A catadioptric (mirror) lens has a ring-shaped pupil because of its central obstruction, so its highlights are not disks but doughnuts, the unmistakable mirror-lens bokeh. An anamorphic lens, with its cylindrical squeeze, renders oval highlights. And an apodized pupil produces the smoothest disks of all. In every case the rule is the same one we started with: the bokeh is the aperture, imaged.
23.1.3 Extending DoF: focus stacking⧉
Sometimes there is simply no aperture that gives enough depth of field. Photograph an insect at life size and the sharp band is a fraction of a millimeter deep: the antennae are sharp and the eyes are already gone. Stopping down should help, and it does, until diffraction (FUNDAMENTALS) softens the whole frame and you lose at the focus plane what you gained in depth; for macro work that diffraction wall arrives long before you have the depth you want. The same problem appears at the other end of scale (a landscape with flowers a foot from the lens and a peak at infinity) and in product and studio work. The answer is to give up on getting the depth of field from a single exposure and instead build it from many: focus stacking.
The recipe is simple to state. Capture a stack of frames at stepped focus distances, each one sharp in a thin slice of the scene, with the slices overlapping so that together they cover the whole depth range. Then composite the result by keeping, for each pixel (or small region), the sharpest sample across the stack, and assembling those sharpest pieces into a single all-in-focus image (Figure 23.1.4). "Sharpest" is measured with the very same high-frequency-energy / local-contrast metric that drives contrast-detection autofocus and depth-from-focus in the previous chapter. Focus stacking is depth-from-focus that keeps the image instead of the depth. Done well, it produces a picture with depth of field that no real aperture on that lens could deliver, and without the diffraction penalty, because each slice can be shot near a useful sharpness optimum. Diffraction is still present at that aperture; stacking avoids the additional diffraction of stopping down much further.
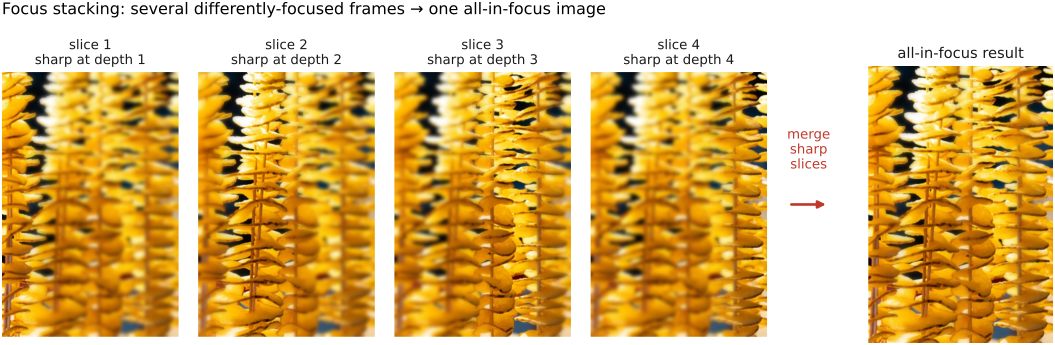
The catch is registration. As you rack focus, the lens does not only change which plane is sharp; it usually changes the magnification of the whole frame slightly: the image breathes in or out. This focus breathing means that a feature sits at a slightly different pixel between two slices, so the frames must be aligned (scaled and shifted to a common frame) before the sharpest-pixel selection, or the composite will show double edges and halos. Focus stacking is therefore a multi-image fusion problem of exactly the kind the book treats elsewhere (register, then select/blend per pixel) and the same alignment-and-fusion machinery (cross-ref the fusion/stacking discussion in the multi-exposure part) applies. The comparison with stopping down is the main point here: stopping down buys depth of field at the cost of light and, eventually, diffraction softening the whole image; focus stacking buys it at the cost of several exposures, registration, fusion, and potential motion or occlusion artifacts, and beats the diffraction wall by never asking any single frame to do more than it can.
23.1.4 Controlling and faking DoF⧉
Depth of field is a creative control, so the last question is how to get the depth of field you want in either direction. Making it shallow on purpose uses the FUNDAMENTALS levers, with several interacting controls. The instinct is to "use a longer lens," but the framing-invariance result says that, for a fixed subject size and a fixed f-number, focal length barely changes the depth-of-field band. What actually thins it is magnification, getting the subject larger on the sensor, together with a wide aperture. So the practical recipe for a strongly blurred background is: open up to your widest usable f-number, get the subject big in the frame (step closer, or use a longer lens and fill the frame the same way), and put a lot of distance between the subject and the background so the background's defocus disks grow large. The long lens does help the background look more blurred, but, as FUNDAMENTALS noted, that is because it magnifies the already-out-of-focus disks, not because it shrank the depth-of-field band around the subject.
The opposite problem is common on phones, which cannot physically produce much shallow depth of field, and it is solved in software: fake or computational depth of field, the portrait-mode effect offered by many phones. The reason it is needed is the sensor-size scaling above: a phone's tiny sensor gives it huge depth of field, so to imitate a large-sensor portrait the phone must synthesize the background blur. The pipeline is: estimate a depth map for the scene (from the dual-pixel disparity of the previous chapter, from a second camera's stereo, or from a learned monocular-depth network) and then apply a depth- and occlusion-aware blur, growing the blur radius with each pixel's distance from the chosen focus plane and rendering a chosen disk shape (so the synthetic highlights can even be made to look like a particular lens's bokeh). And here the load-bearing caveat from the recap comes back to bite: because defocus is not a 2-D convolution, a naive "blur the background uniformly" cannot work. The blur has to follow scene depth, and at object edges the foreground's blur must bleed over the background while the hidden background peeks through. This is exactly why portrait-mode failures cluster at hair, fine edges, and transparency, where the depth map is uncertain and the occlusion bookkeeping is hardest. We are only setting up why the problem is hard and what a depth map buys; the full, occlusion-aware treatment (and the light-field cameras that sidestep it by capturing the rays directly and refocusing after the fact) is forward-referenced to the Advanced computational-camera part.
Everything in this chapter assumes ordinary incoherent imaging, where an out-of-focus object still sends its light to the sensor: it merely spreads into a blur disk. The light is there, just smeared. George Barbastathis (MIT) makes the point that coherent imaging can behave qualitatively differently: arrange the system around a prepared depth, and objects at other depths contribute no light at all to the image. Out of the prepared depth the scene is not soft. It is black. The root of the difference is that incoherent imaging adds intensities, which are always positive, so every depth contributes something (a brighter, blurrier picture); coherent imaging adds complex amplitudes, so off-depth contributions can interfere destructively and cancel to zero. It reframes "depth of field" itself: incoherent optics trades sharpness for a graceful blur, while a coherent system can make depth a hard on/off gate: present or absent, not sharp or soft.