5.5 Developing and editing a photograph⧉
A raw capture of a backlit room can retain both the window and the interior while looking much too dark under a default rendering. Developing the photograph means deciding how those recorded values should appear. The source contains measurements; the finished image gives them an order of emphasis.
Keep the original and a reproducible editing document or recipe. A rendered export is useful for delivery, but it does not preserve every decision or every measurement needed for another version.
5.5.1 The traditional darkroom⧉
In the black-and-white negative process, development turns exposed silver-halide grains into metallic silver, and fixing removes remaining light-sensitive material. Printing exposes photographic paper through the negative to obtain a positive image. The print is a second exposure, with its own contrast and local adjustments.
Dodging holds back enlarger light to make part of the print lighter. Burning adds light to make it darker. These operations give the familiar software tools their names. The Zone System connects decisions at capture and development to the tones wanted in the print Adams, The Negative. The historical connection is useful because it makes a practical point: a recorded negative does not specify one inevitable finished appearance.
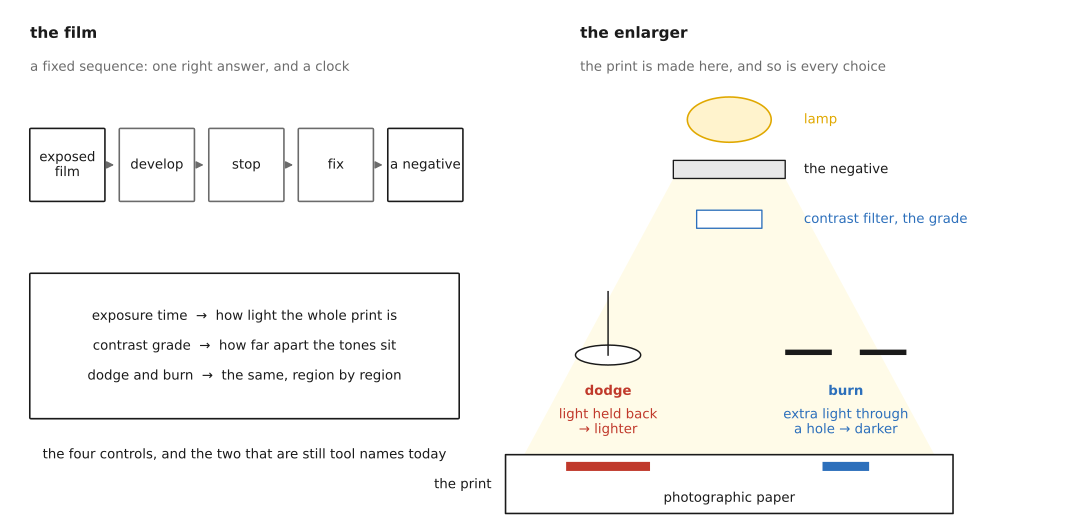
Under the enlarger, printing time controls how much exposure the paper receives. Paper grade, or filtration used with variable-contrast paper, changes the relation between negative density and print tone. A moving hand or paddle holds back light locally for dodging; an extra local exposure burns a region darker. A stop bath halts development before fixing removes the remaining light-sensitive material. These are distinct stages with distinct controls.
Two printers can start from the same negative and make different prints by changing those decisions. The negative is the recorded material; the print is its interpretation for a particular paper, light, and purpose. This is the practical meaning of comparing the negative to a score and the print to a performance. Digital development preserves that freedom while making many of the settings easier to record and repeat.
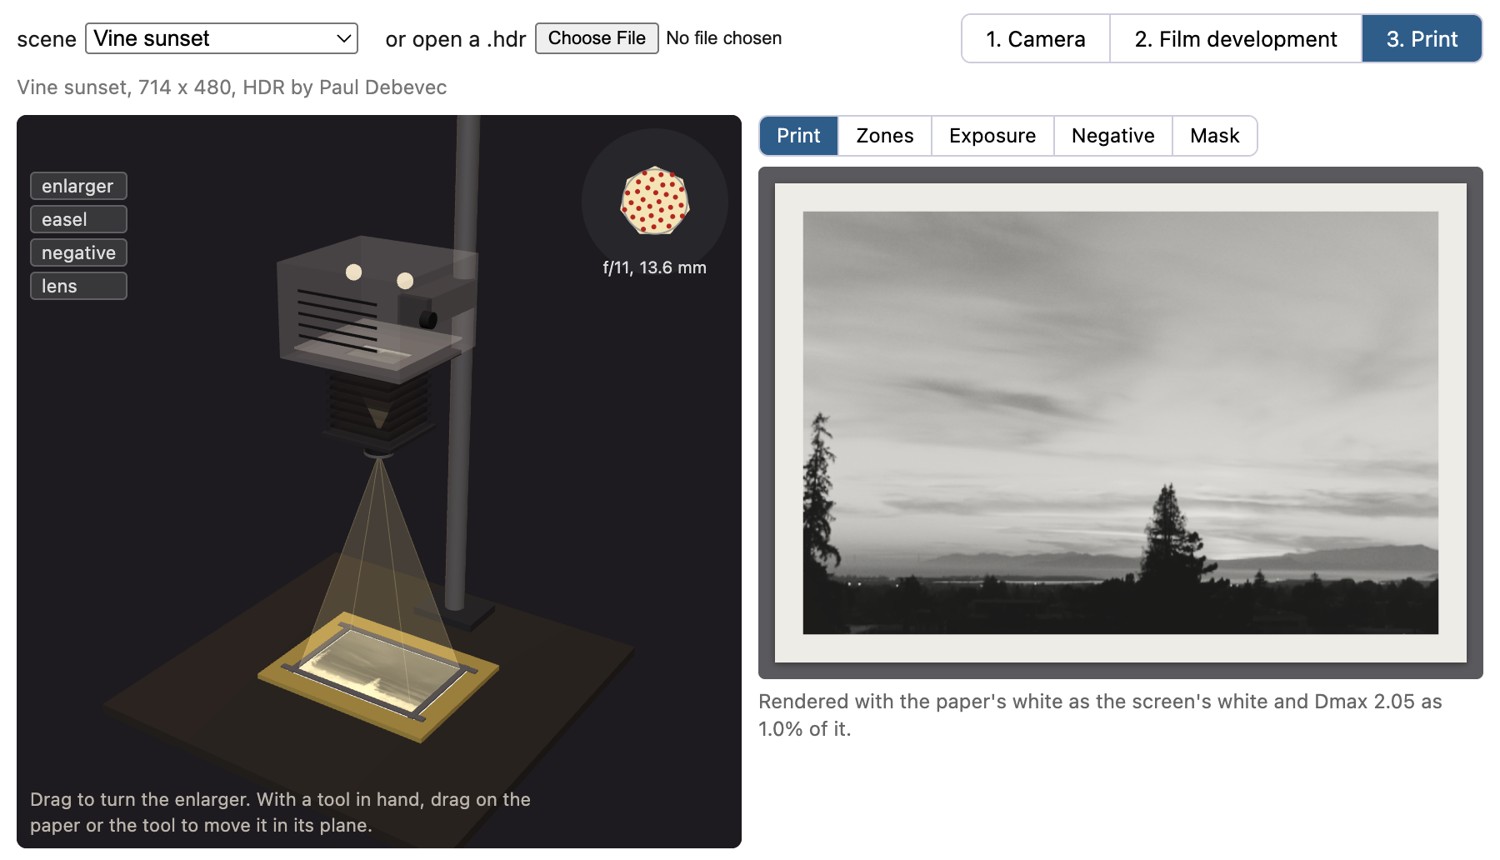
The whole chain can be tried in a simulator (Figure 5.5.2). It starts from a high-dynamic-range scene, so the camera records a real range of luminances, and follows Adams's three books in order: expose the negative, develop it, print it.
5.5.2 The digital darkroom⧉
A parametric developer stores a recipe applied to source data. A layered editor stores image elements, masks and operations in a document. These approaches overlap: developers have local masks and retouching, and layered editors can retain reversible adjustment layers and embedded raw sources. The useful distinction is what can be revised and reproduced, not whether an edit is global or local.
Begin by selecting a frame whose expression, focus and motion are suitable. Check highlight clipping and the darkest important detail before spending time on polish. Set white balance for the intended rendering, correct geometry when needed, then establish overall lightness and contrast. Local adjustments can separate the subject or control a bright window without forcing the rest of the frame to follow the same curve. Revisit earlier choices when they interact.
Noise reduction and sharpening should support the intended output. Strong denoising can erase fine structure; sharpening can emphasize both texture and noise. A lens profile can correct systematic geometry or falloff, but resampling changes sampling density and brightening corners also amplifies their noise. “Correction” is still an operation with a cost.
Save a master with enough precision and a documented color interpretation. Export a separate version for the destination, including its color profile, dimensions and output sharpening. If masks depend on an external model or application cache, preserve those dependencies or save the rendered mask. The same recipe numbers can produce different pixels under another processing version.
Chapter 8.3, Tone point operations and Chapter 18.2, Global tone mapping explain tonal controls, Part 15, Demosaicking and joint methods explains reconstruction from a color mosaic, and Chapter 8.13, A raw developer in the browser provides a working developer. An exposure slider changes the recorded values; it cannot add photons or recover a fully clipped channel.
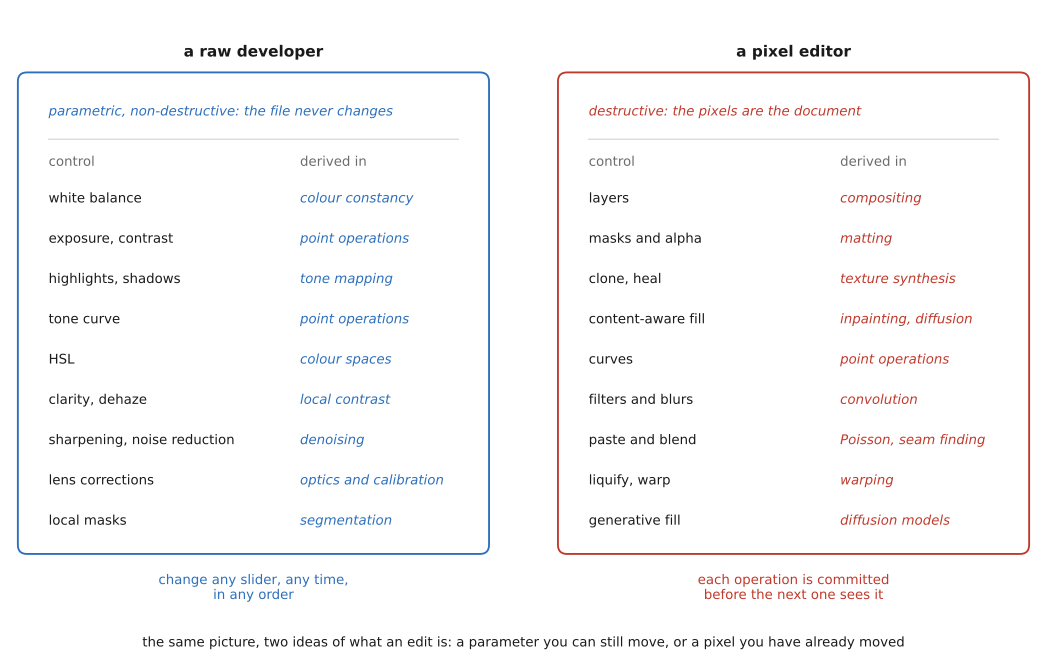
A parametric edit stores a recipe alongside the source rather than repeatedly replacing its pixels. For example, the recipe may record an exposure adjustment, a crop rectangle, and a local mask. Changing the crop later re-renders from the source instead of enlarging an already cropped export. Applying a common white-balance or rendering adjustment to a series likewise changes the recipes while preserving the captures.
This is different from claiming that every operation is reversible in an exported image. A JPEG export may clip highlights, quantize tones, and discard material outside the crop. The editable state survives because the source and recipe survive, not because the export contains enough information to undo every decision. Pixel layers, retouching strokes, and generated content may add further data that must also be retained.
A developer also helps manage a shoot: importing, comparing frames, rating, keywording, and applying a common recipe to a series. A layered editor is useful when the document must keep separate image elements, retouching, masks, or text. Many workflows use both. These are useful emphases, even though modern tools overlap and neither category is restricted to global or irreversible edits.
The control panel is a list of computational problems:
| Photographic control | Computational connection |
|---|---|
| Exposure, levels, curves | Point operations and tone mapping |
| White balance and color mixer | Color transforms and illuminant estimation |
| Sharpening, texture, clarity | Filtering and local-contrast changes |
| Noise reduction | Statistical reconstruction |
| Raw development | Color-mosaic reconstruction and rendering |
| Crop, straighten, perspective | Coordinate transforms and resampling |
| Selections and local masks | Segmentation and spatially varying operations |
| Clone, heal, composite | Copying, reconstruction, and boundary matching |
| Generative fill | Conditional image synthesis |
The names do not uniquely specify an implementation. A healing tool need not use the same algorithm as another application's healing tool. Learning the underlying problem lets us ask what information a control changes, which assumptions it makes, and which artifacts to inspect.
5.5.3 What a photographer actually does with those sliders⧉
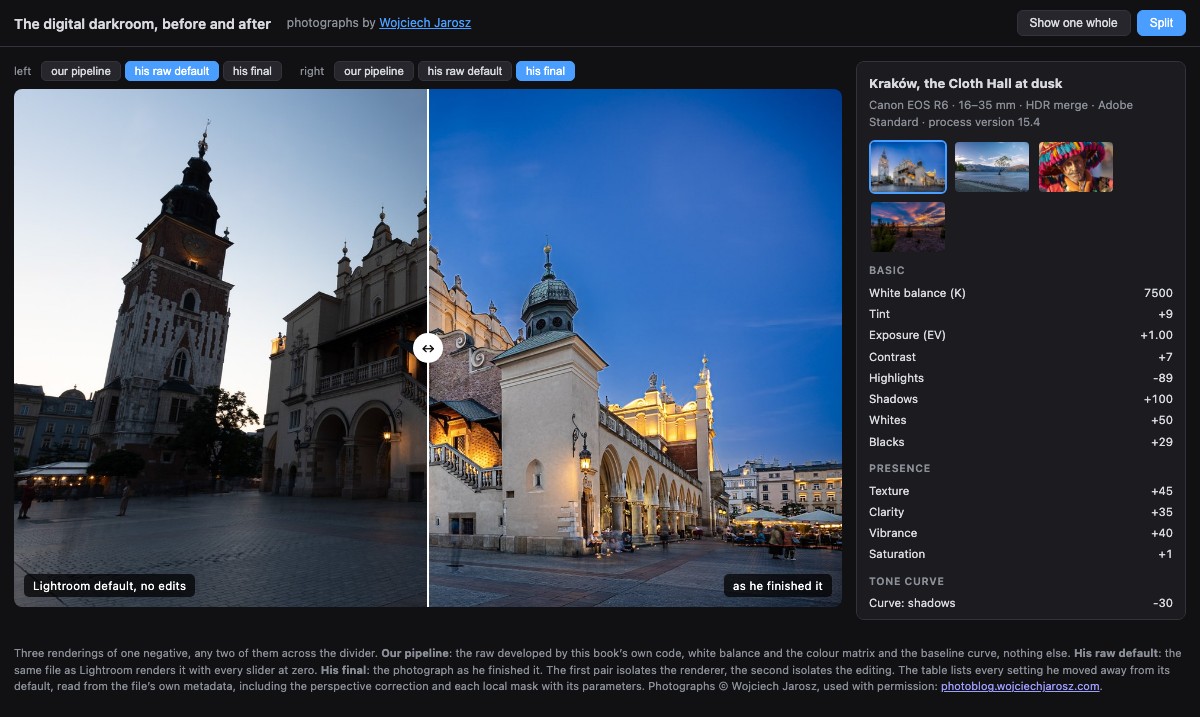
I asked Wojciech Jarosz, a computer graphics researcher at Dartmouth and a photographer and retoucher whose work I admire, for a few of his raw files together with the versions he finished (his photographs are at photoblog.wojciechjarosz.com). Each file carries his develop settings inside it, so we can put the raw beside his print and read the recipe that connects them (Figure 5.5.4). The figure shows three renderings of each negative rather than two, because two different things separate a raw file from a finished photograph, and he exported both of his: the file at Lightroom's defaults, and the photograph as he finished it. Our own baseline render and Lightroom's default render differ only in what the maker of the software decided a raw should look like out of the box. Lightroom's default and his final frame differ by everything he then did.
Here is what he moved, with the defaults left out.
| setting | Cloth Hall | Wanaka tree | Valley sunset | Portrait (2010) |
|---|---|---|---|---|
| White balance (K) | 7500 | 7350 | 3550 | 5000 |
| Tint | +9 | -9 | -1 | -1 |
| Exposure (EV) | +1.00 | +0.75 | +1.08 | -0.50 |
| Contrast | +7 | +5 | +7 | |
| Highlights | -89 | -52 | -83 | |
| Shadows | +100 | +60 | +80 | |
| Whites | +50 | +53 | +6 | |
| Blacks | +29 | +14 | -29 | |
| Texture | +45 | +23 | ||
| Clarity | +35 | +50 | ||
| Vibrance | +40 | +15 | +15 | +25 |
| Saturation | +1 | -1 | -2 | |
| Curve: highlights | +25 | |||
| Curve: darks | +16 | +25 | ||
| Curve: shadows | -30 | -20 | -40 | |
| Color mixer, saturation | Red +26, Orange +40 | |||
| Color mixer, luminance | Blue -52, Purple -20 | |||
| Post-crop vignette | -30 | -20 | ||
| Straighten (degrees) | -0.23 | 0.12 | ||
| Upright (perspective) | Auto, 2 guide segments | |||
| Constrain to warp | on | |||
| Lens profile | 16-35 mm | 16-35 mm | 16-35 mm | 70-200 mm |
| Local mask 1 | sky, AI selection | brush | ||
| saturation +82, exposure -0.25 EV, | exposure +0.09 EV, | |||
| contrast -84, highlights -100, | contrast +35, | |||
| shadows +100, temp -17, tint +24 | saturation -10 | |||
| Local mask 2 | linear gradient | brush | ||
| exposure +0.08 EV, contrast -100, | exposure +0.12 EV, | |||
| highlights +100, shadows +100, blacks +40 | contrast +50 | |||
| Spot removals | 1 | 1 | 1 |
The 2010 portrait speaks an older dialect: Brightness +50, Fill Light 30, Recovery 35, the controls Lightroom offered before the 2012 process version replaced them with Highlights and Shadows. Same intent, different parameterization.
What follows is his account of his process.
It starts in the camera. He shoots to retain highlights, putting the in-camera histogram as far to the right as he can without clipping, at the lowest ISO he can use, which depends on whether he is handheld, on a tripod, or freezing motion. He has never established whether his cameras' clipping warnings describe the raw data or the JPEG the camera renders, and does not trust them, so he stays conservative and keeps extra latitude in the highlights. The captures are often dark as a result, and raising Exposure is one of the first things he does about it: roughly a stop on all three modern frames.
He also watches the clipping warnings on the histogram and does not like to see them fire, so the highlights come down hard (-52, -83, -89) and the shadows come up hard (+60, +80, +100), for a picture that is well exposed overall without crushing the blacks or clipping the whites. That is range compression done by hand. The scene held more range than the print can, so the ends are pulled toward the middle. It is the Zone System's decision made with sliders instead of development times, and the same job the tone-mapping chapter formalizes. Two of these files are HDR merges, so the range being compressed is larger still.
Range compression costs the picture its snap, and Texture and Clarity are what he uses to put it back: +45 and +35 on the dusk frame. They change local contrast at selected scales. Their exact implementation depends on the processing version; the slider names do not specify a single unsharp-mask operator. Global Contrast stays at +5 to +7.
Whites goes +50 and +53 on two of the frames and +6 on the third; Blacks goes +29 on one and -29 on another. The files record the numbers and not what they were reaching for. One practice he does describe is recent: since Lightroom began writing HDR output, he often uses Whites to let the brightest pixels run past the SDR range, which is a different purpose from setting a white point for a print.
Saturation is barely touched; Vibrance does the work. Vibrance runs +15 to +40 while Saturation stays within a point or two of zero. Vibrance is designed to increase less-saturated colors selectively; it does not guarantee that already vivid colors or skin remain unchanged. The color mixer appears once: on the Wanaka frame blue luminance goes to -52 and orange saturation to +40.
White balance goes in opposite directions on two of the frames: 7500 K on the dusk square, which renders warm, and 3550 K on the sunset, which renders cool.
Every frame has its lens profile switched on by name, the Adobe profile for the 16-35 mm or for the 70-200 mm on the portrait, which removes that lens's measured distortion and vignetting at full strength together with automatic lateral chromatic aberration. The profiles compensate for modeled optical effects; they do not recover detail lost to blur or clipped measurements. The architecture frame goes further and applies Upright, Lightroom's perspective correction, in its automatic mode with two guide segments stored alongside, which is what you get when you draw lines along things that should be vertical. The transform the file records is a genuine projective one, and its effect is large: the verticals of the Cloth Hall and the tower converge in the raw and stand up in the final frame. The file also records constrain-to-warp, which is why the frame is cropped, since a keystone correction pushes the corners outside the sensor. Two of the other frames are straightened by fractions of a degree instead, -0.23 and +0.12, the kind of correction you make on a horizon.
Local edits are where the modern tools show up. Two of the four frames carry masks. The dusk square has an AI sky selection, with the sky's highlights taken all the way down (-100) and its shadows all the way up (+100), the exposure trimmed a quarter of a stop, contrast dropped hard (-84), saturation raised (+82) and the color pushed cooler (temperature -17, tint +24); and it has a linear gradient with contrast at -100 and blacks at +40. The portrait has two brushes, the first broad (radius 0.066 of the frame) at exposure +0.09 EV with contrast +35 and saturation -10, the second a pair of small dabs at exposure +0.12 EV and contrast +50. Raising exposure under a brush is dodging by another name. Three of the four frames also carry a single spot removal each.
The figure compares those masks on the picture, because most of a mask is in the file: a gradient is two points, the end where it does nothing and the end where it does everything, and a brush is the list of dabs it laid down, each with a center and a radius. The AI sky selection is not in the file. Lightroom records that a sky mask exists, which version of the model made it, and one reference point, and keeps the raster in its own cache. What the figure shows there is this book's own sky segmentation standing in for his. Reproducing a model-generated mask requires either the saved mask or the relevant model, inputs and processing version.
The story is still overwhelmingly global. Two of the four photographs have no local edit at all, and where masks do appear the global develop has done most of the work.
The recorded parameters describe much of the edit, but application defaults, processing versions and mask data are part of its interpretation. Keep them with the source if the goal is reproduction. The four examples show personal decisions, not presets to copy blindly onto another scene.