5.3 Viewpoint, lenses, and focus⧉
A portrait made from too close exaggerates the nearest features. A longer lens helps only if it lets us step back while keeping the face large enough in the frame. Choose the viewpoint for the relationship between subject and surroundings, then choose the lens to frame that view.
Focus and aperture decide which distances remain legible. Those choices should follow the subject: one eye, a group of people, or the face of a small object impose different requirements.
5.3.1 Lenses and focal length⧉
Focal length determines field of view together with sensor size. “35 mm equivalent” focal length is a convenient framing comparison across formats; it is not the physical focal length to put into an optical equation. A prime has one focal length. A zoom can change framing without moving the camera, though aperture, focus and optical performance can vary across its range.
From a fixed camera position, changing focal length changes magnification and crop, not perspective. Moving closer changes the ratios of distances to near and far features. In a face, the nose becomes much nearer than the ears; in a room, the foreground can grow relative to the far wall. The dolly-zoom and face demonstrations separate these changes. A short telephoto is useful for many portraits because it permits a comfortable working distance at the desired framing, not because its focal length has a uniquely flattering projection.
A wide lens includes more surroundings, at the cost of stronger stretching of objects near the edges of a rectilinear image. A long lens can isolate a distant subject without requiring access to a closer position. Avoid treating “normal” as a literal match to the eye. Human viewing includes eye movements and peripheral vision, unlike one fixed photographic frame.
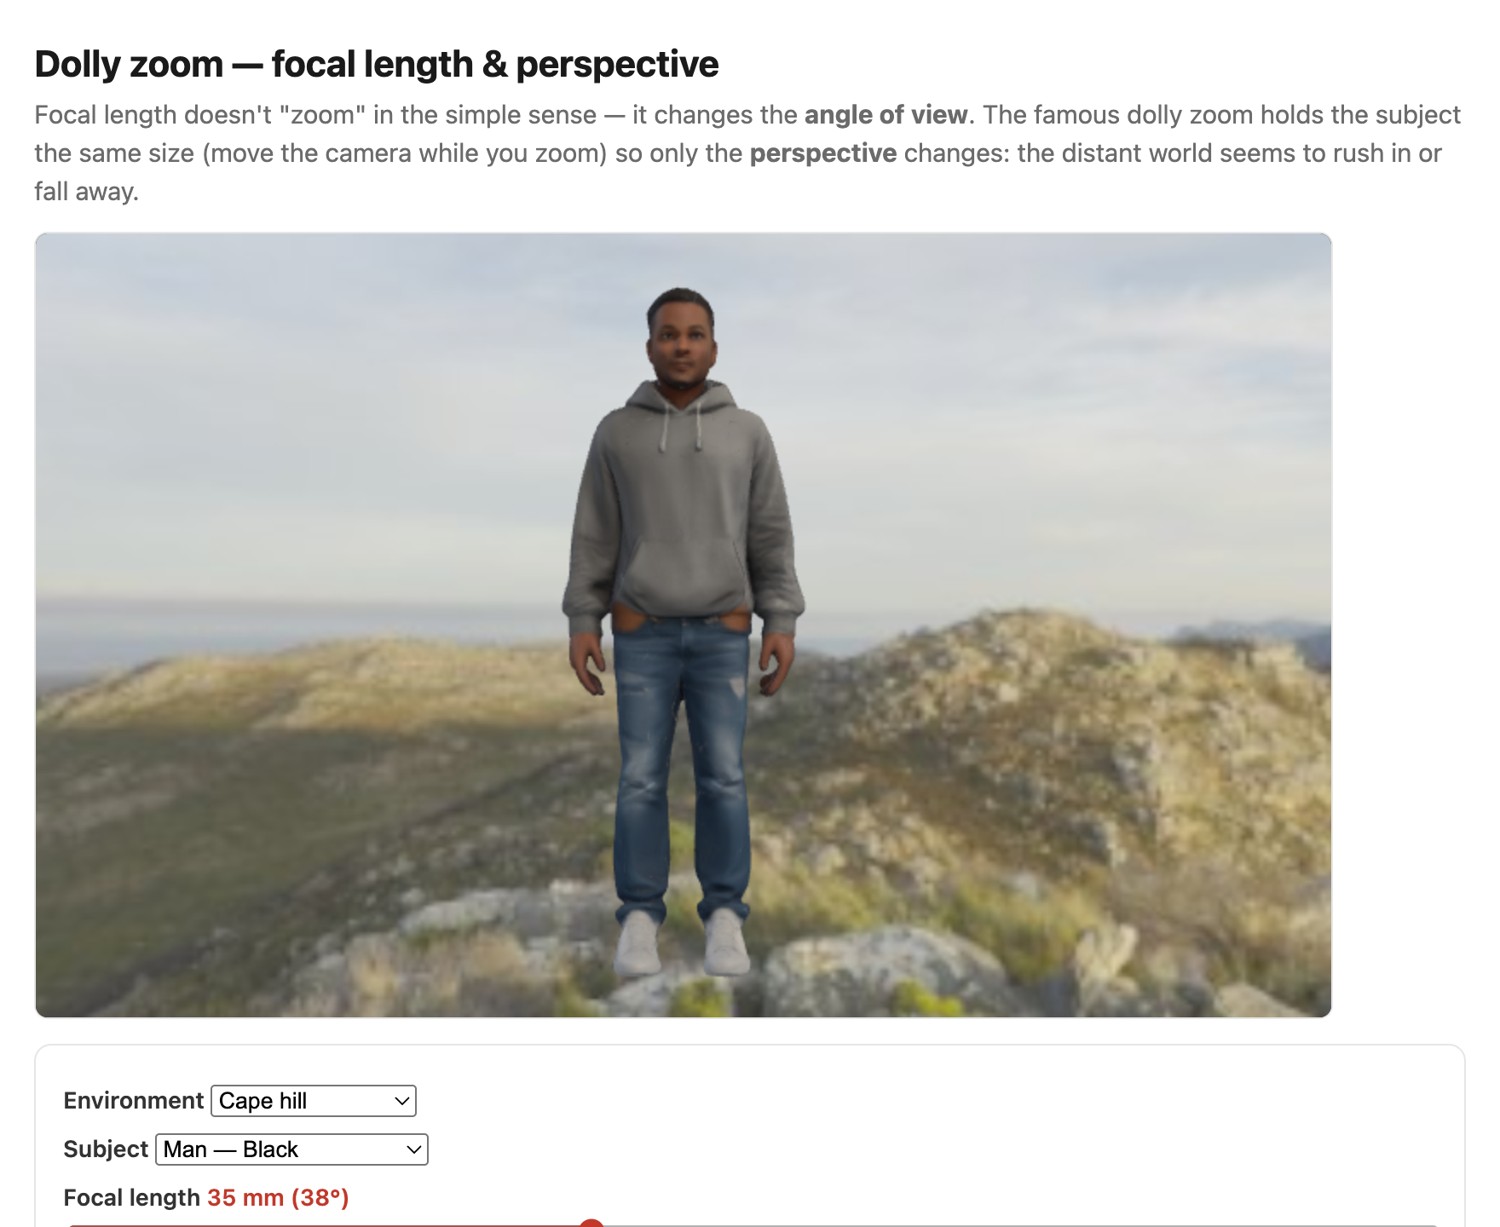
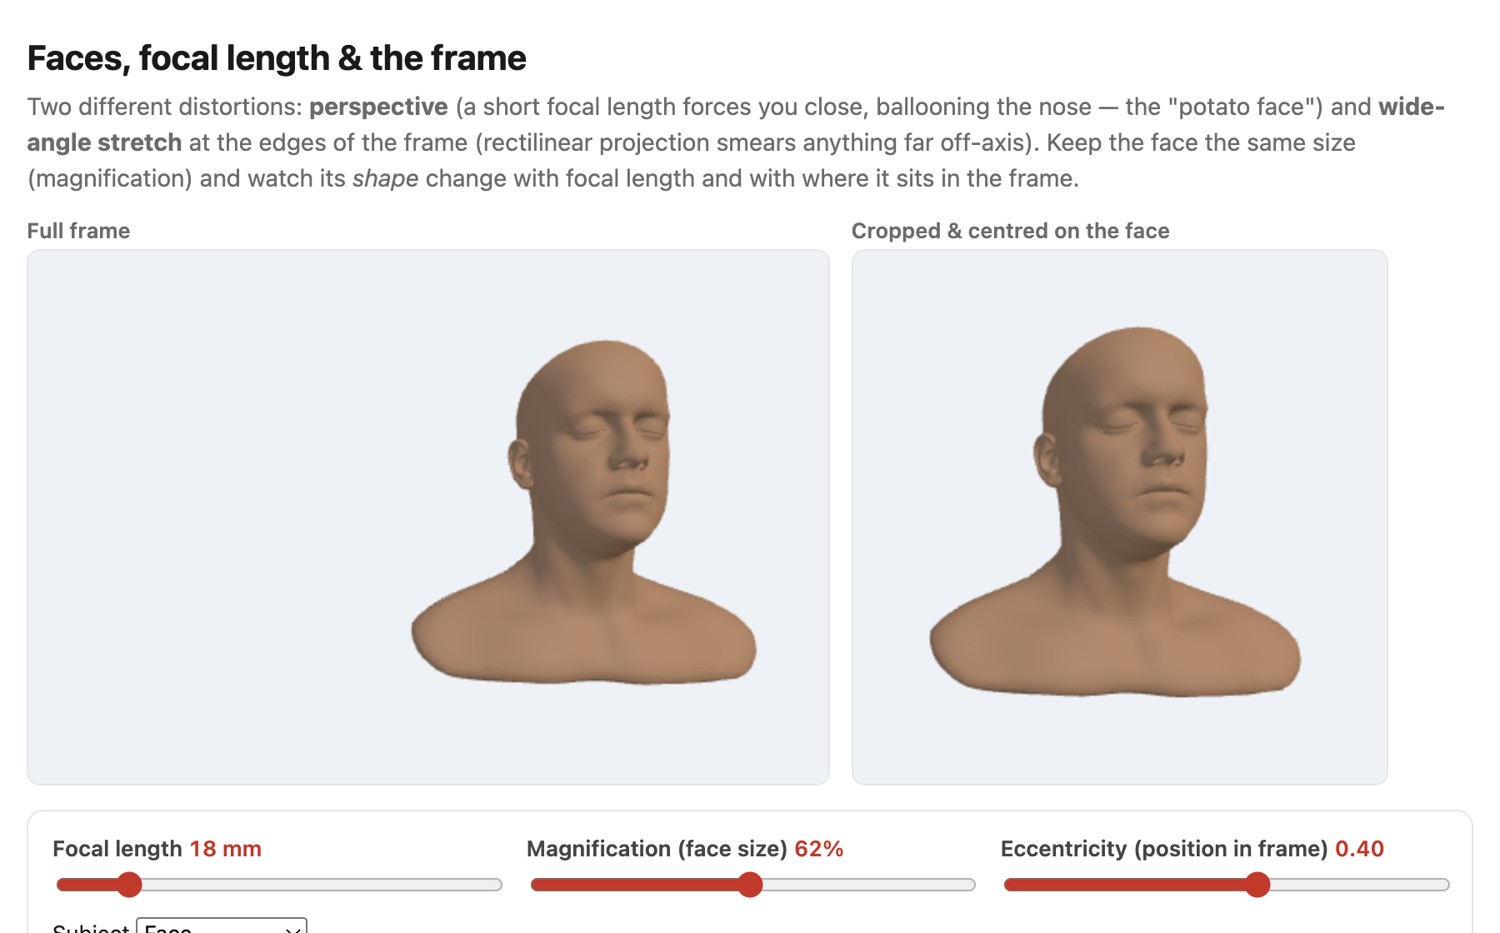
Consider two equal-sized facial details, one closer to the camera than the other. Their projected sizes depend on their respective distances. Moving the camera closer increases the relative difference between those distances, so a nose can appear larger relative to the ears. Changing focal length while keeping the camera in place enlarges or reduces both projections by the same factor and leaves that perspective relationship unchanged.
For a fixed head-and-shoulders framing, however, changing to a longer focal length usually makes the photographer step back. It is that new viewpoint that changes the proportions; the focal length restores the desired framing from farther away. This distinction also explains why cropping a wide-angle picture taken from the same position can match the perspective of a longer lens, while cropping cannot reproduce the perspective of a camera that moved.
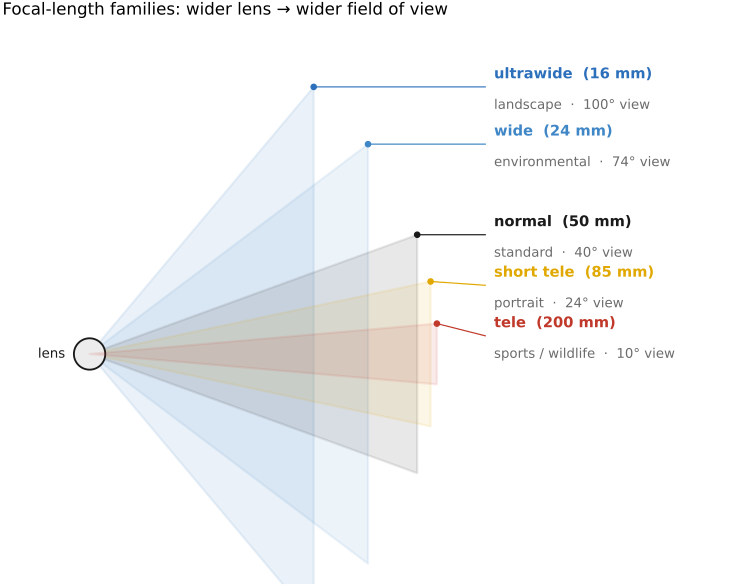
For full-frame framing, photographers often use the following rough families. The boundaries are conventions, and the viewpoint still determines perspective.
| Family | Typical focal lengths | Common reason to use it |
|---|---|---|
| Ultrawide | 24 mm and shorter | Include an interior or a strong foreground-to-background relationship |
| Wide | Around 24–35 mm | Show a subject together with its surroundings |
| Normal | Around 50 mm | Moderate field of view in a general-purpose lens |
| Short telephoto | Around 85–135 mm | Frame a portrait from farther away |
| Telephoto | Around 200 mm and longer | Frame distant sport, wildlife, or details that cannot be approached |
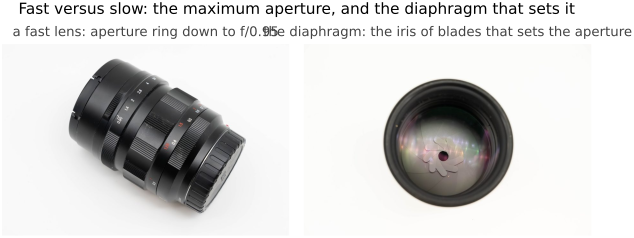
A “fast” lens has a large maximum aperture relative to focal length, such as f/1.4. That can admit more light or produce shallower depth of field. A prime can offer those capabilities with less design complexity than a zoom, but price, size, and performance must be compared for actual lenses. A zoom trades a range of framings against its own aperture and optical constraints. It does not force a change of viewpoint.
Distance can affect how the portrait is read as well as its geometry. Studies discussed by Perona and Bryan and colleagues associate capture distance with judgments about the depicted face [@perona-2007; @bryan-etal-2012]. These are reported perceptual effects under particular conditions, not a universal definition of a flattering focal length. They reinforce the practical point: moving the camera is a decision about the representation of a person, not merely a way to fill the frame.
5.3.2 Aperture and the diaphragm⧉
The diaphragm changes the entrance-pupil diameter and therefore the f-number. Its widest opening admits the most light. Stopping down increases the range of acceptable focus, but eventually diffraction reduces fine contrast throughout the image. There is no universally best aperture: a landscape with an important foreground may benefit from more depth of field even when fine detail becomes slightly softer.
A variable-aperture zoom can lose its widest opening as focal length increases. Check the actual aperture after reframing. Many phone modules have a fixed aperture and obtain much of their subject isolation through estimated-depth processing. Optical defocus still exists on a phone, particularly at close range; “small sensor” does not mean everything is in focus.
The two aperture limits are named in opposite directions: maximum aperture is the widest opening and smallest f-number; minimum aperture is the narrowest opening and largest f-number. A zoom marked f/3.5–5.6 can open to f/3.5 at one end but only f/5.6 at the other. Keeping the same maximum f-number while focal length grows requires the entrance pupil to grow proportionally, which constrains the optical design.
The diaphragm blades also shape the opening. Their number and curvature affect out-of-focus highlights and diffraction spikes around bright points, as discussed in Chapter 23.1, Bokeh, focus stacking, and depth-of-field control. Clicked aperture controls help select repeatable steps; a continuously adjustable control can make an aperture change smoother during a video shot. Exposure range, defocus appearance, and control behavior are separate lens properties.
5.3.3 Focusing the lens⧉
Focus places one object distance at best focus. Depth of field describes a tolerance around it, not a slab of uniformly perfect sharpness. That tolerance depends on output size and viewing conditions as well as optics; Chapter 2.5, Depth of field gives the derivation.
For a group portrait, check the nearest and farthest important faces. For a close object, try aligning its important surface with the focus plane before stopping down. Moving the camera can save more light than a smaller aperture. Focus-and-recompose can shift a close subject away from the plane just selected; place the focus area on the subject in the final composition when focus is critical.
A useful thin-lens estimate for landscape work is the hyperfocal distance,
where $c$ is the accepted blur-circle diameter at the sensor. For a 24 mm lens at f/8 with $c=0.03$ mm, $H_f\approx2.42$ m. Focusing there puts infinity at the chosen tolerance and the near limit at roughly half that distance. A stricter output criterion, such as $c=0.015$ mm, nearly doubles the hyperfocal distance (Figure 5.3.3). The calculation does not include diffraction, aberrations or focusing error. Check the important distances in a magnified capture rather than treating the engraved scale as a guarantee.
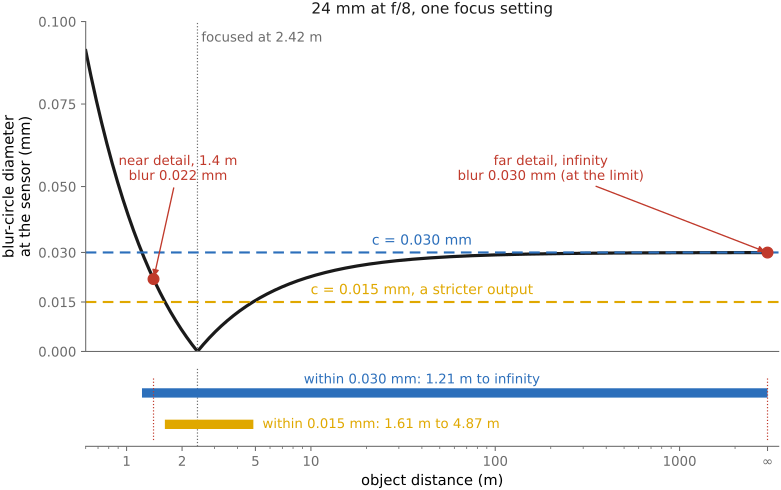
Minimum focus distance is usually measured from the sensor plane. Working distance is the clearance in front of the lens. At close range, that clearance determines whether we can light the object without the lens casting a shadow. Two lenses at the same magnification can provide very different working distances.
Focus behavior while zooming matters especially in video. A parfocal zoom is designed to retain focus as focal length changes. A varifocal design shifts the focus setting, so the camera or operator must compensate. An autofocus adjustment that is unobtrusive between still photographs can be visible as a hunt during a shot. Test the actual zoom movement and focus distance, rather than assuming the name “zoom” guarantees focus retention.
A fixed-focus camera makes a different compromise. It chooses one focus setting to cover an intended range of distances within an accepted blur tolerance. A small aperture and short focal length can make that range broad, but close subjects still fall outside it. Hyperfocal distance is one useful design calculation, not a guarantee that every fixed-focus device is set exactly there.
5.3.4 Choosing and checking autofocus⧉
Use single-shot autofocus for a stationary subject when the camera and subject distance will remain fixed. Use continuous autofocus when distance changes, and choose a focus area that excludes likely distractions. Eye detection can select a useful target, but inspect which eye was selected and whether its detail is actually sharp. A detection box indicates a target, not a focus measurement.
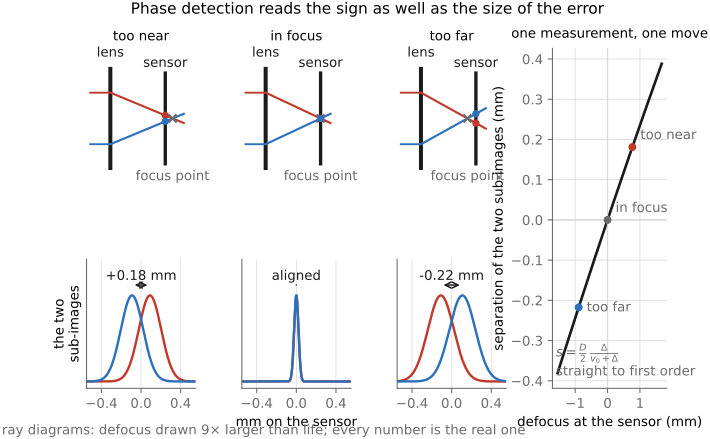
Contrast-detection autofocus searches for a sharpness maximum. Phase-detection autofocus compares views through different parts of the pupil to estimate the direction and amount of defocus. On-sensor phase detection avoids a separate focus sensor, but it still needs usable image structure and a calibrated lens response. Repeating patterns, low contrast, obstructions and rapid motion can defeat either approach. Chapter 22.9, Autofocus explains the measurements; Chapter 22.8, Focus covers the mechanics.
Manual focus is useful when automation repeatedly chooses the wrong surface, or when a repeatable focus position matters more than tracking. Magnified live view is a direct check. Focus peaking highlights contrast and can also highlight noise or a textured surface that is not quite sharp enough. A focus limiter restricts the lens's search range and can prevent a long excursion toward an irrelevant foreground. For a focus pull in video, check whether framing changes with focus, a lens property called focus breathing.
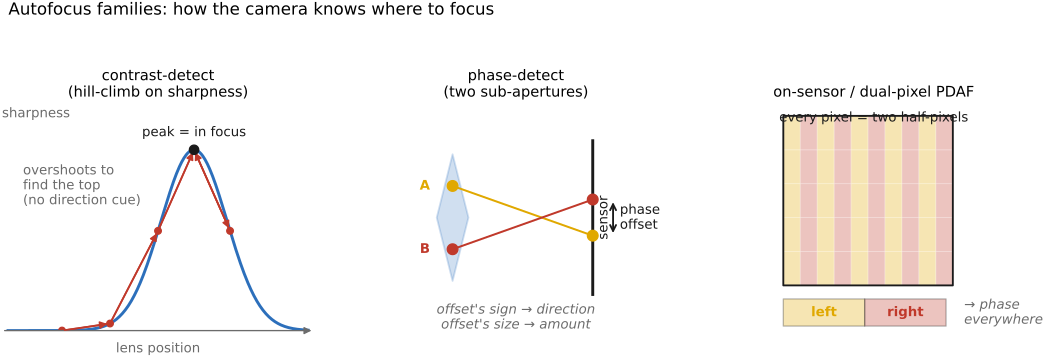
A fence illustrates why choosing the focus target matters as much as choosing the autofocus mode. A broad area can lock onto the high-contrast wire in front of the subject. A smaller focus area, a suitable tracking target, or manual focus lets you specify which depth matters. Repetitive patterns and low contrast can make the choice uncertain even when the focus motor is fast. Check the intended feature rather than only the camera's confirmation symbol.
A focus limiter restricts the distance range the lens searches, when the lens provides one. For a distant bird, excluding nearby distances can prevent a long search through an irrelevant range. For a close subject, leaving that restriction engaged can prevent focus entirely. The limiter changes the search, not the depth of field or the lens's optical resolution.
Phase detection has a geometric interpretation: the two pupil regions see slightly displaced images when the subject is defocused. Comparing them can provide a direction in which to move focus, where a single contrast measurement merely reports how sharp the current image is. Older SLR implementations used a separate autofocus sensor fed through the mirror system. On-sensor implementations use selected masked pixels or split photodiodes to sample the pupil views at the imaging sensor. Dual-pixel measurements can also supply depth cues for computational defocus, within the limits of their small baseline.
Depth-from-defocus methods make a different measurement. Compare images acquired at different focus settings and use a calibrated model of how the lens blur changes to estimate the required focus adjustment. The model depends on the lens and capture conditions. This explains how useful focus information can be obtained without dedicated phase-detection pixels, and why calibration and a final sharpness check still matter.
Back-button focus is a control choice rather than a new focusing method: a separate button triggers focus while the shutter button triggers capture. It lets the photographer decide when a previous focus setting should be retained and when it should be updated. As with a focus limiter, its usefulness depends on understanding what the control leaves fixed.
5.3.5 Image stabilization⧉
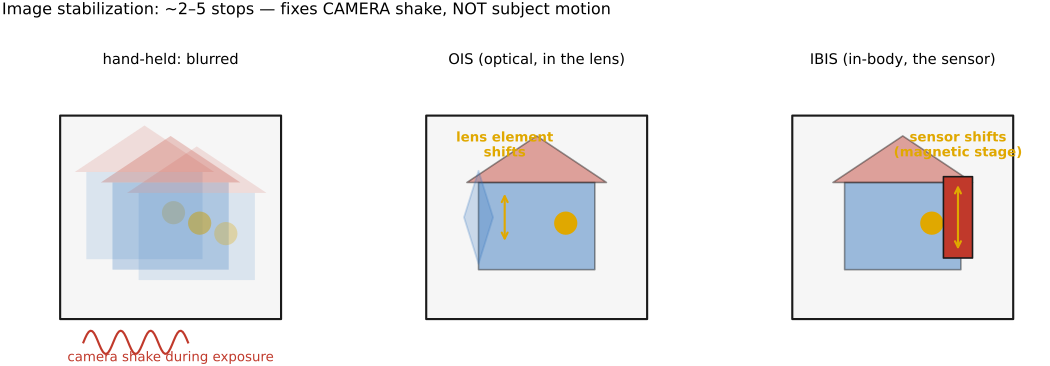
Camera shake and subject motion need different remedies. Optical stabilization moves a lens group; in-body stabilization moves the sensor. Either can reduce some camera-induced image motion during the exposure, within its correction range. Digital stabilization warps and crops recorded frames; alignment alone does not undo the blur already integrated within each frame.
A stabilized wall can look sharp behind a blurred person. Shorten time for the person or use a sufficiently brief flash when ambient light is weak enough. Advertised stabilization stops describe a particular test and success criterion: a claim of four to five stops means that, under that test, a shot that needed 1/100 s might succeed between about 1/6 s and 1/3 s. Verify a repeatable handholding time with your own focal length, stance and output size. For deliberate panning, use the supported panning mode or check whether correction fights the intended movement.
5.3.6 Keeping the lens clean⧉
A fingerprint can scatter strong light across the image and reduce contrast. Check the front element when flare or a washed-out region appears, especially on a phone lens that is handled often. Remove loose grit before wiping, and follow the manufacturer's cleaning method for the coating. A cautious order is gentlest first: a blower to lift loose grit without dragging it across the glass, then a soft brush, then a microfiber cloth or lens pen, and a drop of lens cleaning fluid only for a stubborn smear, wiping from the center outward. Never dry-wipe a gritty element, which grinds the grit into the coating. A lens hood or a protective filter prevents much of the problem.
Small dust particles on the front element are far from focus and usually do not form recognizable spots. Sensor-cover dust is a more likely cause of fixed dark spots that become conspicuous at small apertures. Diagnose the location before cleaning: repeated aggressive wiping of the lens will not remove sensor dust. Sensor-dust spots stay in the same place in the frame when you change lenses or zoom, which is the giveaway. Many cameras shake the sensor ultrasonically at startup to shed dust; beyond that, a blower or a wet swab cleans the sensor cover, and a dust map lets software retouch the spots automatically.
5.3.7 Lens filters: polarizers, ND, and graduated ND⧉
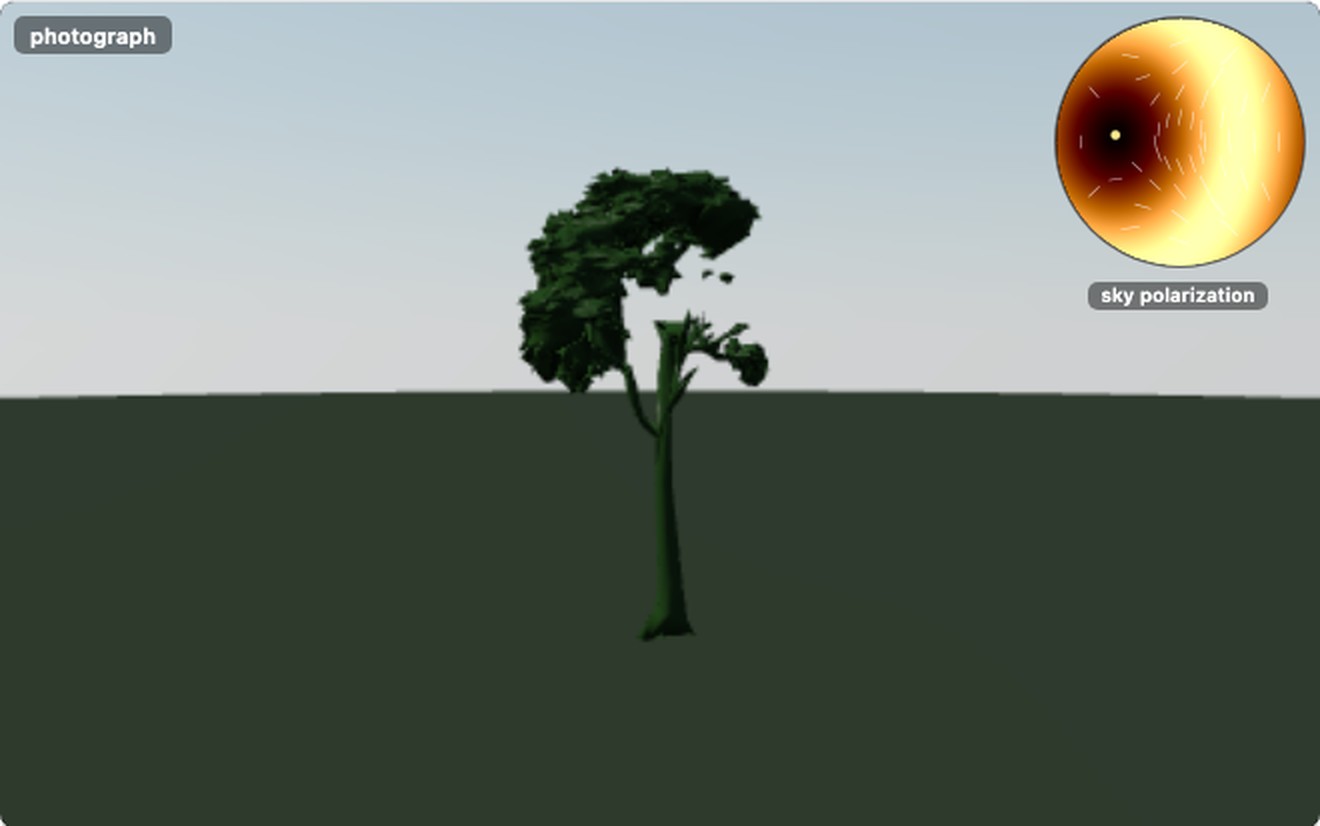
A polarizer changes the mixture of polarized light reaching the sensor. Rotate it while watching reflections from water, glass or foliage. Its effect depends on the illumination and viewing geometry; it cannot remove every reflection. A photographic circular polarizer combines a linear polarizer with a quarter-wave plate to accommodate polarization-sensitive camera optics. It does not restore light hidden by a reflection; it selects a different measurement before that mixture is recorded.
A neutral-density (ND) filter reduces light so we can use an otherwise saturating time or aperture. If the filter removes $k$ stops, the same optical exposure requires
at unchanged aperture. A six-stop filter turns 1/64 s into 1 s. The water then blurs over one second while a static rock remains stationary. Darkening an unfiltered, clipped one-second exposure in software cannot reproduce the measurement. A variable ND uses polarization optics and can introduce uneven attenuation or color shifts.
A graduated ND attenuates one region, often the sky, to fit a larger scene range into one exposure. It works best when its transition matches the scene; mountains and buildings crossing it can be darkened undesirably. Bracketing offers a different compromise when motion and alignment permit it. A protective filter adds a surface that may introduce reflections, so check it when photographing bright lights.
A stabilizer can deliberately move the image as well as counter shake. Bando and Holtzman Bando & Holtzman 2011 used this control to shape blur. Deliberate coded motion is a different capture strategy from trying to hold an image stationary.