22.19 Rendering a raw DNG⧉
A raw DNG is not a picture. It is a grid of sensor measurements plus a recipe for turning them into one (this is the thesis of the format appendix). "Render it" hides two different jobs that this book keeps deliberately separate:
- The radiometric job — recover a scene-linear image: values proportional to the light that fell on the sensor, white-balanced and in a known color space (we use linear sRGB primaries). This is the array every algorithm in the book wants — HDR merging, white balance, blur/deblur, denoising, demosaicking, Poisson editing — because in linear light the physics is honest (see Draft — 03-01 Image representation).
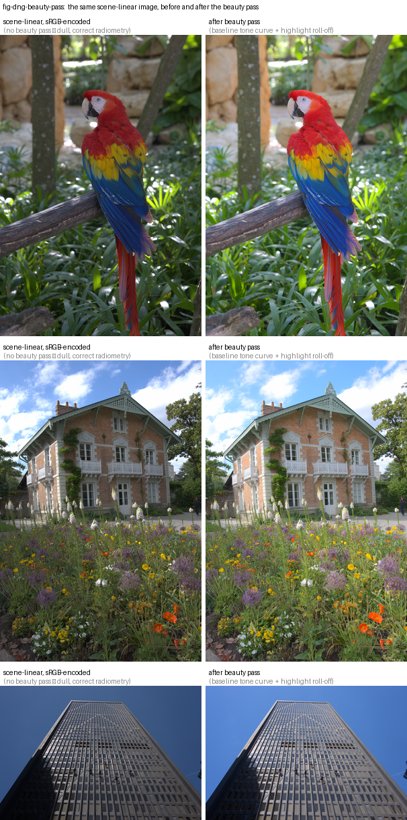
- The cosmetic job — produce a pleasing displayed image that matches what the photographer saw in Lightroom. A scene-linear image shown directly looks dull and dark: it is missing the camera/Lightroom look — a baseline tone curve that lifts the midtones, a gentle highlight roll-off, and a touch of saturation. We call that final step the beauty pass.
Do all processing in scene-linear; apply the beauty pass only at the very end, for display. Never blend, blur, merge, or solve on the beautified image, and never bake the beauty pass into a file you will later compute on. The beauty pass is a display transform, not data.
22.19.1 The pipeline, step by step⧉
Inputs: the original Bayer DNG (libraw/rawpy can read it) and its embedded XMP develop settings written by Lightroom. Our reference implementation lives in dng_linear_correct.py (the radiometric job, baked once into a demosaicked LinearRaw DNG) and figures/imageops.py (load_linear_dng, then linear_to_display, the beauty pass).
1 — Read the Lightroom develop settings (XMP). From the DNG's XMP packet, read the crs: fields: Exposure2012 (in stops), Temperature and Tint (white balance), WhiteBalance (As Shot / Custom), and the crop rectangle (HasCrop, CropTop/Left/Bottom/Right, CropAngle). These are the photographer's artistic decisions; honoring them is what makes the render match Lightroom rather than some neutral default.
2 — Demosaic to camera-native linear. Demosaic the Bayer mosaic with no gamma, no auto-brighten, and no white balance yet: rawpy.postprocess(gamma=(1,1), no_auto_bright=True, user_wb=[1,1,1,1], output_color=raw, output_bps=16). The result is linear, camera-native RGB, black/white-level normalized to $[0,1]$.
3 — White balance from Temperature/Tint. Convert Lightroom's Temperature/Tint to camera-channel multipliers using Adobe's own dng_temperature algorithm (the kTempTable/kTintScale from the DNG SDK: temperature→$xy$ chromaticity, then through the DNG ColorMatrix/CameraCalibration to camera-neutral multipliers), and multiply the camera RGB by them (green normalized to 1). Using Temperature/Tint — not the camera's as-shot neutral — is what reproduces a custom white balance set in Lightroom.
4 — Color: camera-native linear → linear sRGB. This is the subtle step. Using the DNG's ForwardMatrix (camera → XYZ D50) and CameraCalibration (CC), the Adobe forward transform is
with AB the AnalogBalance (identity for us). Then $\text{linear sRGB} = M_{\text{XYZ(D50)}\to\text{sRGB}}\cdot \text{cameraToXYZ}_{D50}\cdot \text{cameraRGB}$. The reference-neutral normalization and the inverse of CC are both essential — see Easy mistakes. After white balance is baked (step 3), AsShotNeutral is neutral $[1,1,1]$, so refNeutral $= \mathrm{CC}^{-1}\mathbf{1}$.
5 — Exposure. Multiply the linear image by $2^{\,\text{Exposure2012}}$. In linear light, exposure is an honest multiply (see Draft — 03-03 Point operations).
6 — Crop (and straighten). Apply the crop rectangle and any straightening angle.
The result of steps 1–6 is the scene-linear ground truth. This is what load_linear_dng(name, output="linear") returns, and what every algorithm figure runs on. Showing it directly is where it looks dull — that is correct, not a bug.
s     = read_xmp(dng)                         # crs:Exposure2012, Temperature, Tint, Crop*
cam   = rawpy.postprocess(dng,               # demosaic only — camera-native LINEAR
          output_color=raw, gamma=(1,1), no_auto_bright=True,
          user_wb=[1,1,1,1], output_bps=16) / white_level     # → [0,1]
mult  = wb_multipliers(s.Temperature, s.Tint, color_tags)     # Adobe dng_temperature
cam  *= mult                                  # white balance (green-normalized)
CC, FM, AB = color_tags.CameraCalibration2, ForwardMatrix2, AnalogBalance(or I)
refN  = inv(AB·CC) · AsShotNeutral            # AsShotNeutral now [1,1,1] (WB baked)
M     = XYZ_D50_to_sRGB · FM · diag(1/refN) · inv(AB·CC)
lin   = clip(cam · Mᵀ, 0, 1)                  # linear sRGB primaries
lin  *= 2**s.Exposure2012                     # exposure (a multiply in linear)
lin   = crop(lin, s.Crop*)                    # crop + straighten
# `lin` is the scene-linear ground truth. Beauty pass (step 7) is display-only.
(The two reference 3×3s: XYZ_D50_to_sRGB is the standard Bradford-adapted matrix; FM/CC come from the DNG tags, interpolated between the two calibration illuminants by correlated color temperature — we use the higher-CCT pair, index 2, e.g. D65.)
7 — The beauty pass (display only). To display, encode to sRGB and apply the camera/Lightroom look: a baseline tone curve that lifts the midtones (~1–1.6 stops — the single biggest reason scene-linear looks dark), a highlight roll-off, and modest saturation. Our linear_to_display uses a smooth, monotone baseline curve (recovered empirically by fitting our linear-render luminance to Lightroom-JPG luminance across a test set) with a highlight-weighted hybrid roll-off: midtones are toned hue-preserving so saturated colors stay saturated, but as luminance approaches white the curve goes per-channel so bright skies and the sun desaturate cleanly to white instead of taking on a magenta/cyan cast. Saturation is a mild luma-preserving boost that eases off in the highlights.
22.19.2 Where Lightroom's "look" actually comes from⧉
Lightroom's render is not just the color matrix. With an "Adobe Standard" or "Adobe Color" DNG camera profile (DCP), the chain is: matrix → HueSatMap (an HSV calibration table) → LookTable (the creative "look") → the baseline tone curve. Our pipeline reproduces the matrix faithfully and approximates the baseline tone curve with the beauty pass, but it does not apply the profile's HueSatMap/LookTable. In testing, the matrix-plus-beauty render matches the Lightroom JPG closely; applying our own re-implementation of the HueSatMap/LookTable helped only marginally and risked worse color (a too-purple blue), because the LookTable's value-encoding and HSV conventions are easy to get subtly wrong. So we deliberately stop at matrix + beauty. This is the main thing we would ask an Adobe engineer to confirm: (a) that our ForwardMatrix·diag(1/refNeutral)·CC⁻¹ composition is the correct forward transform, and (b) whether skipping HueSatMap/LookTable is an acceptable approximation or a real error for our use.
22.19.3 What we would ask an Adobe engineer to check⧉
In decreasing order of how much it would change our output:
- The forward transform. Is
cameraToXYZ_D50 = FM · diag(1/refNeutral) · (AB·CC)⁻¹, withrefNeutral = (AB·CC)⁻¹ · AsShotNeutral, the correct composition? Our bug was applyingFM · CC(un-inverted, no reference-neutral) — we want confirmation the corrected form matches Camera Raw, and that picking the index-2 (higher-CCT)FM/CCrather than CCT-interpolating between illuminants 1 and 2 is acceptable for daylight scenes. - Skipping HueSatMap / LookTable. We apply the matrix + a baseline tone curve but not the profile's HueSatMap or LookTable. Is matrix-plus-baseline-curve a defensible approximation of "Adobe Standard"/"Adobe Color," or does omitting those tables introduce errors that matter (and if we did apply them, what are the exact value-encoding and HSV-space conventions for the LookTable)?
- The baseline tone curve. We recovered a baseline curve empirically (fitting our linear-render luminance to the Lightroom-JPG luminance). Is there a canonical baseline tone curve for the current Process Version we should use instead, and is it applied per-channel, on luminance, or in some other space?
- Highlight roll-off. We desaturate highlights toward white with a luminance-weighted blend toward a per-channel curve. How does Camera Raw actually roll highlights to white?
22.19.4 Two kinds of DNG, and the special cases⧉
- The original Bayer DNG is what
rawpy/libraw reads (it expects a mosaic). The demosaicked LinearRaw DNG thatdng_linear_correct.pywrites (steps 1–6 baked in) is not a mosaic;rawpycannot open it — read it withtifffile(load_linear_dng). Confusing the two is a common error. - HDR and panorama DNGs are different animals: a merged HDR DNG holds extended-range (>1.0) linear data and needs a tone-map, not a plain beauty pass; a Lightroom panorama bakes its own tone processing into JPEG-XL tiles, so treating it as raw-linear over-brightens it. Both need handling outside the normal path.
22.19.5 Easy mistakes (most of which we made)⧉
This pipeline is a minefield, and a wrong render looks almost right. In rough order of how badly each bit us:
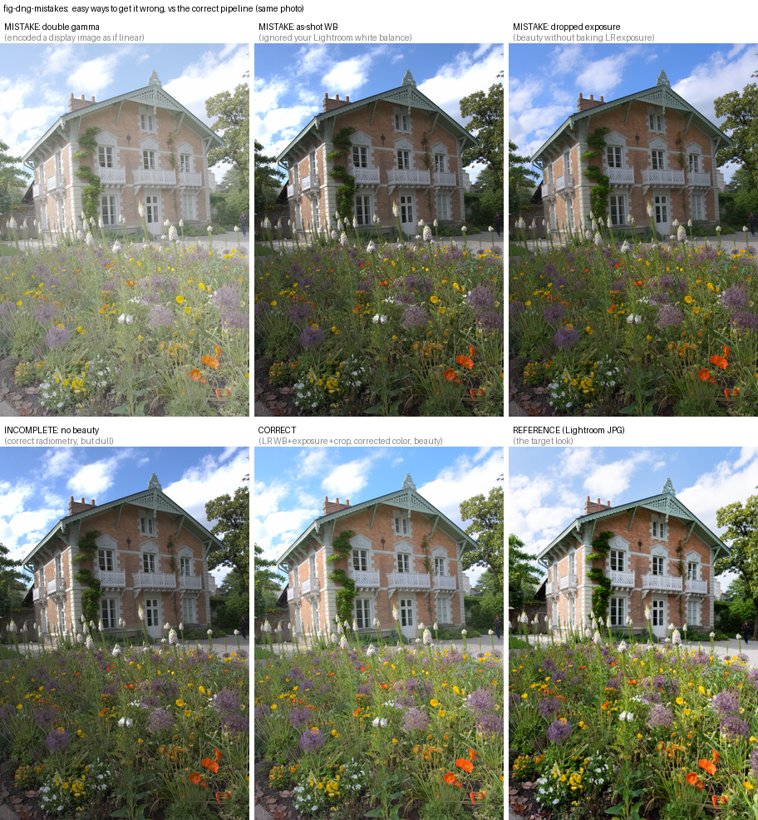
- Forgetting the beauty pass. Scene-linear shown directly is dull and ~1–1.6 stops too dark. This is correct radiometry but looks broken, and the temptation is to "fix" it with ad-hoc brightness/contrast/saturation hacks. The principled fix is a tone curve (the baseline "beauty" curve), applied only for display.
- Double gamma. Encoding an already-sRGB image to sRGB again (or running the beauty pass, which re-applies gamma, on data that is already gamma-encoded). The image goes washed-out and milky. Symmetric mistake: feeding linear data to something expecting sRGB. Always know the encoding of the array in your hand (the thesis of Draft — 03-01 Image representation).
- CameraCalibration applied wrong. The headline bug. Composing the color transform as
FM · CC(theCCun-inverted, with no reference-neutral normalization) instead ofFM · diag(1/refNeutral) · CC⁻¹. With a diagonalCC = diag(1.026, 1, 0.960), this injects a fixed ~4% blue deficit / ~2% red excess — a faint warm/yellow cast on every image, invisible until you measure neutral patches. The corrected transform maps a neutral to a true neutral. - As-shot white balance instead of the photographer's. Letting
rawpyuse the camera's as-shot neutral (use_camera_wb) instead of converting Lightroom's Temperature/Tint. On any frame where the WB was adjusted in Lightroom this gives visibly wrong skies (too warm, too cyan). - Auto-exposing instead of honoring the exposure. Normalizing every image to a fixed mid-grey to "make it bright" ignores the photographer's
Exposure2012and flattens artistic intent — every photo comes out the same brightness. Bake the LR exposure; don't auto-expose. - Hue-preserving highlights. Applying the tone curve as a luminance ratio scaled across all channels preserves hue into the highlights — so a clipping sky keeps its blue/magenta tint instead of rolling off to clean white. Real cameras desaturate highlights toward white. Our fix is the highlight-weighted hybrid (per-channel roll-off near white).
- A kinked tone curve. A tone curve that plateaus then jumps to 1.0 produces banded, ugly highlights. Use a smooth, monotone curve (we use a Fritsch–Carlson monotone cubic) with a soft shoulder.
- Over-reaching on the profile. Re-implementing the DCP HueSatMap/LookTable badly (wrong value-encoding, wrong HSV space, premature gamut clipping in a narrow space) gives harsh, oversaturated greens and purple-ish blues — worse than skipping them. Know when to stop.
- Baking the beauty pass into data. Saving beautified images and then computing on them (Poisson blending, HDR merge) does the math in the wrong space. The beauty pass is the last step, for display only.
- Wrong DNG, wrong reader. Trying to
rawpy.imreada demosaicked LinearRaw DNG (or matching files by filename when the content has been swapped). Read LinearRaw withtifffile; match by content, not name.