3.16 Beauty curves: the camera "look"⧉
Build the cleanest imaginable pipeline — demosaic the raw, white-balance it, get the color matrix exactly right, encode to sRGB — and the picture that comes out still looks flat, dark, and disappointing. Nothing is broken. The image is radiometrically correct: its numbers are faithful to the light that hit the sensor. It just isn't pretty, because every camera JPEG and every raw developer you have ever admired secretly applies one more step that a "correct" pipeline omits: a look curve — informally, a beauty curve — that lifts the midtones, rolls the highlights off gently, and nudges the saturation. This chapter is about that curve: what it does, why scene-linear needs it, and the one rule for applying it without corrupting your data.
A scene-linear render is correct but dull; a camera/raw "look" curve makes it pretty. The two are different jobs. Do all your processing — white balance, blur, HDR merge, Poisson blending — on the scene-linear data, and apply the beauty curve only at the very end, for display. Never blend or merge on the beautified image, and never bake the look into a file you will compute on again. The beauty pass is a display transform, not data.
3.16.1 Why scene-linear looks dull⧉
Two facts conspire. First, most of a normal scene is dark in linear light. Mid-grey — the tone the eye reads as "middle" — sits near $0.18$ in linear reflectance, not $0.5$. Encode that honestly to sRGB and the midtones land low; the picture reads as underexposed even though the exposure is right. Second, a bare encode has no shoulder: highlights march straight into the clip at $1.0$ with no gentle roll, so skies and speculars look harsh and plasticky. The camera's beauty curve fixes both at once. Measured against a Lightroom-developed reference, the missing lift is large — on the order of 1 to 1.6 stops in the midtones — which is exactly why an un-beautified DNG render looks one or two stops too dark even when nothing is wrong (see the DNG appendix, where this dullness is the first and worst mistake).
This is not the HDR tone mapping of the previous chapter. Tone mapping compresses an enormous dynamic range into a displayable one and is, in everyday photography, comparatively rare. The beauty curve is applied to every photograph, all the time — it is the baseline "render" that makes a standard-range capture look finished. The shapes rhyme (both lift shadows and roll off highlights), but the job is different: tone mapping compresses range; the beauty curve styles a render.
3.16.2 The shape of the curve⧉
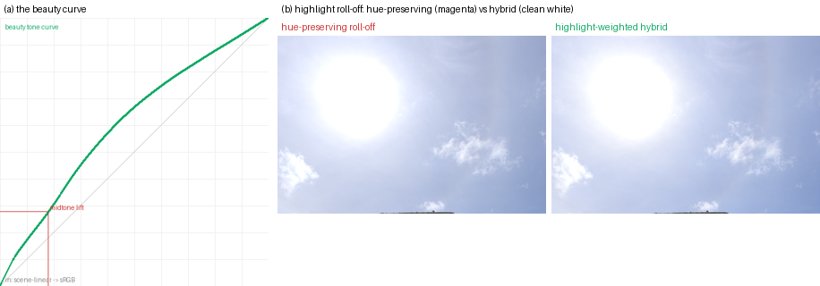
A good beauty curve (Figure 3.16.1a) is a smooth, monotone S-ish curve that bows above the diagonal through the midtones — the lift — and bends back toward the ceiling with a soft shoulder in the highlights. It must be smooth (we use a monotone cubic): a curve with a kink, or one that plateaus and then jumps to white, produces visible banding and ugly highlights. The midtone lift is the headline; the shoulder is what keeps bright regions graceful.
Where does the exact shape come from? In a real camera or in Lightroom it is part of the camera profile (Adobe's "Adobe Standard"/"Adobe Color" DCP carries a baseline tone curve, on top of which sit a HueSatMap and a creative LookTable). For this book we recovered an equivalent baseline curve empirically, by fitting our scene-linear render's luminance to a Lightroom-developed JPG across a set of test photographs; the fit is consistent enough across scenes to confirm that a single fixed curve is doing most of the work.
3.16.3 Highlights: roll off to white, not to a color⧉
There is a subtlety that bites everyone (it bit us). The naive way to apply a tone curve to a color image is to compute its effect on luminance and scale all three channels by the same ratio — this preserves hue, which sounds desirable. But it is wrong in the highlights: a bright blue sky pushed up a hue-preserving curve stays vividly blue right up to the clip, and the over-driven channels take on a magenta or cyan cast instead of bleaching to clean white the way film and real sensors do (Figure 3.16.1b, left). The fix is a highlight-weighted hybrid: keep the hue-preserving scaling in the shadows and midtones (so a deep-blue sky stays saturated), but as a pixel's luminance approaches white, blend toward applying the curve per-channel, which lets each channel saturate independently and rolls the brightest tones cleanly to white (Figure 3.16.1b, right). A matching detail: ease the saturation boost off in those same highlights, so you are not re-coloring the very tones you are trying to whiten.
3.16.4 Saturation, and the rest of the "look"⧉
A touch of saturation (a luma-preserving boost of the order of $+10\%$, see Point operations) finishes the look; much more and greens go garish and skies turn unreal. In a full camera profile there is more — the HueSatMap and LookTable that shape specific hues — but those are a style, not a necessity, and re-implementing them badly does more harm than good (a too-purple blue, oversaturated foliage). For a faithful, neutral render, a smooth baseline curve + a gentle highlight-aware saturation gets you most of the way, and stops short of the territory where a do-it-yourself profile starts hurting.
3.16.5 The discipline⧉
Everything above is a display step. The reason to be strict about that is the reason this chapter sits in BASIC at all: the moment you bake the beauty curve into your working image, every later operation runs in the wrong space. White balance, HDR merge, deblurring, and especially gradient-domain edits like Poisson blending must see scene-linear (or a clean gamma/log encoding of it), not the look-curved render. So the rule restated, because it is the whole point: process in linear; beautify last.
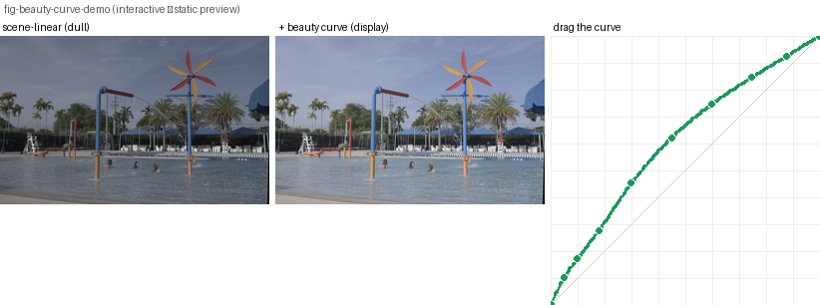
You can feel the whole development — load scene-linear, choose an encoding, shape the curve, watch the highlights roll — in the interactive demo (Figure 3.16.2): drag the curve's control points and toggle the highlight roll-off between hue-preserving and hybrid to see the sky go magenta or stay clean, all applied as a final display transform over an unchanged scene-linear image.
Big lessons of this chapter
The recurring principles from this chapter, gathered for review.
A scene-linear render is correct but dull; a camera/raw "look" curve makes it pretty. The two are different jobs. Do all your processing — white balance, blur, HDR merge, Poisson blending — on the scene-linear data, and apply the beauty curve only at the very end, for display. Never blend or merge on the beautified image, and never bake the look into a file you will compute on again. The beauty pass is a display transform, not data.